Sometimes around the homestead we need to move large heavy things. I discovered when working on the sawmill that I could move logs weighing over a ton by myself, if I was patient and thoughtful, not to mention careful. For the logging operation I eventually built a logging arch from an old boat trailer. It uses wheels and leverage in an amazing way so that moving even the heaviest log was a breeze to move. (To see the design and build of the arch go to my YouTube video https://www.youtube.com/watch?v=_ol54XCobTs)
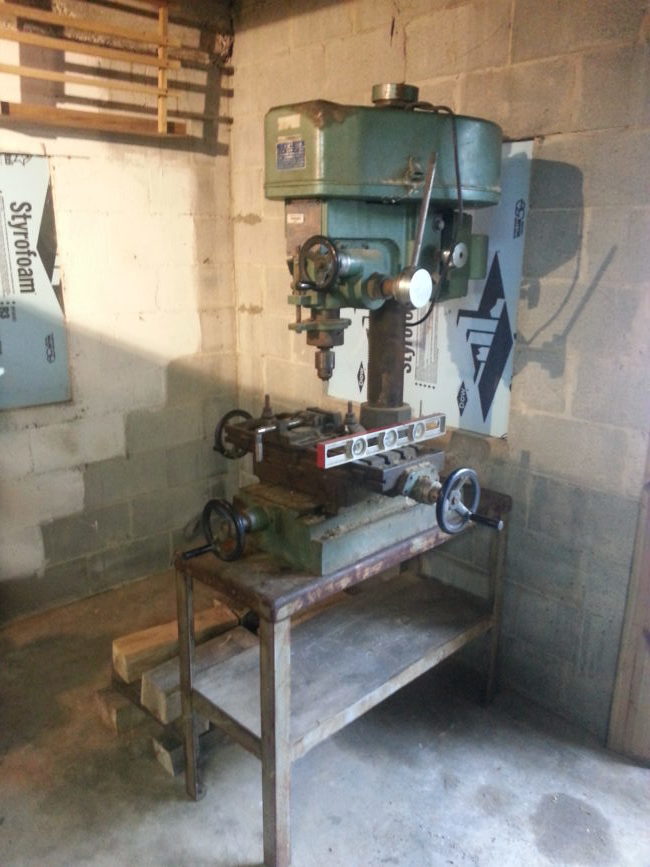
Recently, I purchased a vertical milling machine at an estate sale and discovered I needed some way of moving it. Just in case you don’t know, a VMM is a really big, heavy-duty, drill press which not only drills holes vertically but is also capable of shaping metal on the horizontal axis.
The VMM is designed to sit on a 30” tall stand. The actual machine is about 4 feet tall, 16 inches wide, 3 feet long and weighs nearly a HALF TON! With the help of some friends we managed to get the machine home and I temporarily put in on the concrete floor of the covered porch. I finally decided it was time to move the behemoth to my new shop in the basement and place it on its stand. So how do you move a half-ton chunk of metal, raise it 30 inches, and place it in close quarters?
Par for my course, I underestimated the time necessary for the project. I thought I could do it in a couple of hours. Eight hours later, I finally had the machine positioned in my shop. Here is how I did it.
On the concrete porch floor, I used two pry bars to get a “bite” under the base of the VMM and pried it up enough to get a (24” long) piece of 3/4” iron pipe under it. (I had to first dress the face of one of the pry-bars with a file before it would be sharp enough to fit between the concrete and the base of the VMM.) Using two pry-bars to raise the VMM, I positioned one of the pipes near its center point. With the pipe in this position it was easy to rock the ½ ton of dead weight with one hand. Rocking the VMM back, I inserted another pipe under the front of the VMM. On these two rollers a child could push the weight across the smooth concrete floor… about 12 inches at a time. As the rear pipe rolled out from under the machine I placed another pipe under the front to make another 12 inches of progress.
Using four pipes as rollers, we quickly maneuvered the VMM to the front of the porch were I had backed my utility trailer as close as possible. I placed two 8′ long 2x8s (with concrete blocks supporting them mid way) as ramps between the concrete floor of the porch and the trailer. As I started up the ramp using the rollers, I quickly discovered that while I could pry the VMM up the ramps it wanted to role back down each time I re-positioned the pry-bars. I had to tie a cinch rope from the front of the trailer to the VMM to hold the progress I made. With Susan’s help on the cinch rope we slowly managed to climb the 12.5 percent grade onto the trailer!
Once on the trailer, I secured the VMM over the axle of the trailer and backed it up to the entrance of its new home in the basement. Once again I had to raise the VMM about 12 inched to get it into he shop. I used the same procedure with ramps, but this time I did not have Susan to assist me, so I pulled it up the ramps using a come-a-long. Using the come-a-long and pipes as rollers, it took almost no effort at all.
Once in the basement, I again, used the pipes as rollers to position VMM in the exact location I wanted it, and started lifting it the 30 vertical inches necessary to place it on its stand. This 30” elevation was the longest distance of the move and required the most time, patience, and care.
To lift the VMM, I used “cribs” built just a few inches wider than the stand the machine would sit on. I first pried the machine up off the floor just enough to get a 1 inch board under one side. Then I moved to the other side and did the same. Going back and forth around from side to side, I raised it 1 inch at a time until I could slip two 4×6 inch cross beams (48 inches long) under the VMM. Now that the weight was on the beams, I began building the 4 cribs under the ends of the two beams.
Always careful to keep the beams (and the VMM) as level as possible, I raised the beams one inch at a time until I could get a bottle jack under it. With the bottle jack in place, I no longer had to pry the weight up but could jack it up. Each time I raised the beams 5 inches using 1 inch boards, I replaces the 1 inch boards with one 4×6 inch piece of cribbing. When the machine was high enough, I slipped the stand under it and reversed the process until the 4×6 cross beams were resting on the stand. Further reversing of the process allowed me to replaces the 4 inch beams with three 1 inch boards and then two… one… and finally the VMM was sitting on the stand where I wanted it.
I have always been amazed at he work that the real homesteaders were able to do. Their secret was their patients, hard work, and head work, but not their brute force. The only advise I can gave anyone who is thinking about moving a heavy object is to think about it first and proceed with patience and care. Don’t get in a hurry so you won’t get hurt. You may be may be amazed and what you can accomplish all by yourself.
[ngg_images source=”galleries” container_ids=”3″ display_type=”photocrati-nextgen_basic_thumbnails” override_thumbnail_settings=”0″ thumbnail_width=”240″ thumbnail_height=”160″ thumbnail_crop=”1″ images_per_page=”20″ number_of_columns=”0″ ajax_pagination=”0″ show_all_in_lightbox=”0″ use_imagebrowser_effect=”0″ show_slideshow_link=”1″ slideshow_link_text=”[Show slideshow]” order_by=”sortorder” order_direction=”ASC” returns=”included” maximum_entity_count=”500″]